Revenge of the Stitch markers/La dame des anneaux-marqueur
Français plus bas
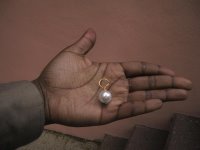
The stitch markers in the picture are similar to the ones I'll be sending out because their all from the same beads kit but only one here is exactly thesame.
I got a request from Meredith who asked me how I made my stitch markers. And now that my head has properly deflated, here's how I made them. Like I wrote in the comment section, I checked a few sites but you can say it's mostly based on this one, except for the part about making the "jewel" from clay and baking it... Unfortunately I'm still waiting for my battery charger to come in so in the mean time, I hope my insctructions are clear.
Heres what you need to make a stitch marker:
-Beads, of course. It goes without saying that you have to use the ones with the small holes but if you use the kind that little girls (or a Williams sister) can thread their braids into, use another bead to keep it from falling off
-3" head pins
-Needle nose pliers (without teet or they'll mark the wire)
-Wire cutter (though I forgot I had one and did just fine without it)
-One 9mm (US 13) straight knitting needle although a similar sized dowel will do (you can use whatever size you want, I just chose a size that would make my marker fit on several sizes of needles)
I got my beads on sale at Omer Deserres which has a nice selection of kits and honestly the prices are comparable everywhere. For the head pins, I recommend Dressmaker (2186 Ste Catherine W, QC Atwater Metro) it's half the price of Fabricville and it's the only place I found the 3" head pin and the ones they sell at Omer Desserres come in kits that I didn't care for. Why 3"? Because I don't use key rings for the loop (hence why we need a dowel or straight needle, more on that later). As for the hardware, they sell them too but you can get them at you're favorite hardware store.
 1. Assemble the beads you want to use [long winded explanation as to colours selection and arrangement, themes. playful versus serious etc]and thread the beads on the pin, leaving at least an inch clear of beads
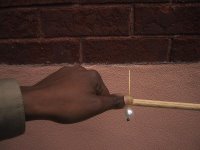
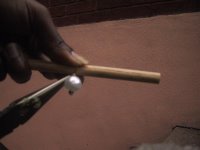
 2.Bend the wire around the dowel or needle.
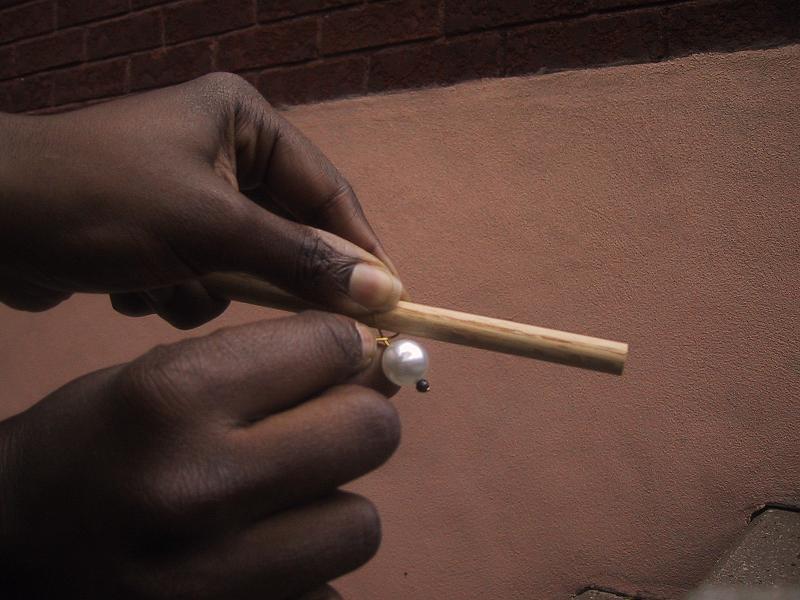
 3. Wrap the wire around itself on just above the top bead. I do this here with my fingers but I also use the pliers when I no longer have a good grip.
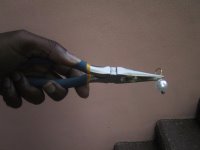 4. Pinch or cut the bit of wire left.
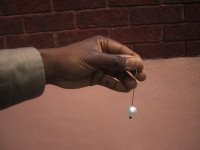
 5. Remove the needle or dowel and voilà! A very pretty stitch marker.
Les anneaux-maqueur qui en photos ont été faits avec les mêmes perles avec lesquelles avec j'ai fait les anneaux que je vais envoyer dans l'échange mais
Dans un de mes blogs récent j'ai eu une demande pour des explications sur la façon de faire des anneaux marqueurs. J'avais fouillé sur la Toile pour trouver des instructions et je pourrais dire que ma méthode est basée sur celle-ci quoique je puisse dire que je ne les ai pas fait en pâtes à modeler... Malheuresement je n'ai toujours pas encore reçu mon charge-batterie donc en attendant j'espère que mes intstructions sont claires...
Voici ce dont vous aurez besoin:
-Des perles. Si jamais vous utilisez cela que des stars de tennis peuvent se passer dans leurs tresses il faudrait en utiliser une autre pour empêcher la perle de tomber
-Des épingles à bijoux de 3"
-1 pince à long nez (sans dents sinon il marquera l'épingle)
-1 coupe-câble(quoique je n'en avais pas et ça ne m'a pas aucunement gêné)
-1 aiguille à tricot de 9mm ou encore un goujon de taille similaire (vous pouvez utiliser la taille que vous voulez mais j'ai décidé de les faire avec une ouverture assez grande pour qu'il fasse à plusieurs tailles d'aiguilles
J'ai acheté mes perles à rabais chez Omer Deserres. Ce magasin a une sélection assez hétéroclite et de toute façon, les prix sont comparables que partout ailleurs. J'ai acheté les épingles chez Dressmaker (2186 Ste Catherine O, QC Atwater Metro), elles y sont moins chers que chez Fabricville et c'est le seul endroit où on vend les épingles de 3".
1. Assembler les perles sur l'épingle selon l'arrangement que l'on préfère tout en laissan au moins 1" libre au dessus.
2. Plier l'épingle autour de l'aiguille ou goujon.
3. Tourner l'épingle autout de lui-même au dessus des perles sous le goujon ou aiguille.
4. Pincer ou couper l'excédent de l'épingle.
5. Retirer l'aiguille ou goujon et voilà! un très joli bijou.
The stitch markers in the picture are similar to the ones I'll be sending out because their all from the same beads kit but only one here is exactly thesame.
I got a request from Meredith who asked me how I made my stitch markers. And now that my head has properly deflated, here's how I made them. Like I wrote in the comment section, I checked a few sites but you can say it's mostly based on this one, except for the part about making the "jewel" from clay and baking it... Unfortunately I'm still waiting for my battery charger to come in so in the mean time, I hope my insctructions are clear.
Heres what you need to make a stitch marker:
-Beads, of course. It goes without saying that you have to use the ones with the small holes but if you use the kind that little girls (or a Williams sister) can thread their braids into, use another bead to keep it from falling off
-3" head pins
-Needle nose pliers (without teet or they'll mark the wire)
-Wire cutter (though I forgot I had one and did just fine without it)
-One 9mm (US 13) straight knitting needle although a similar sized dowel will do (you can use whatever size you want, I just chose a size that would make my marker fit on several sizes of needles)
I got my beads on sale at Omer Deserres which has a nice selection of kits and honestly the prices are comparable everywhere. For the head pins, I recommend Dressmaker (2186 Ste Catherine W, QC Atwater Metro) it's half the price of Fabricville and it's the only place I found the 3" head pin and the ones they sell at Omer Desserres come in kits that I didn't care for. Why 3"? Because I don't use key rings for the loop (hence why we need a dowel or straight needle, more on that later). As for the hardware, they sell them too but you can get them at you're favorite hardware store.

 1. Assemble the beads you want to use [long winded explanation as to colours selection and arrangement, themes. playful versus serious etc]and thread the beads on the pin, leaving at least an inch clear of beads
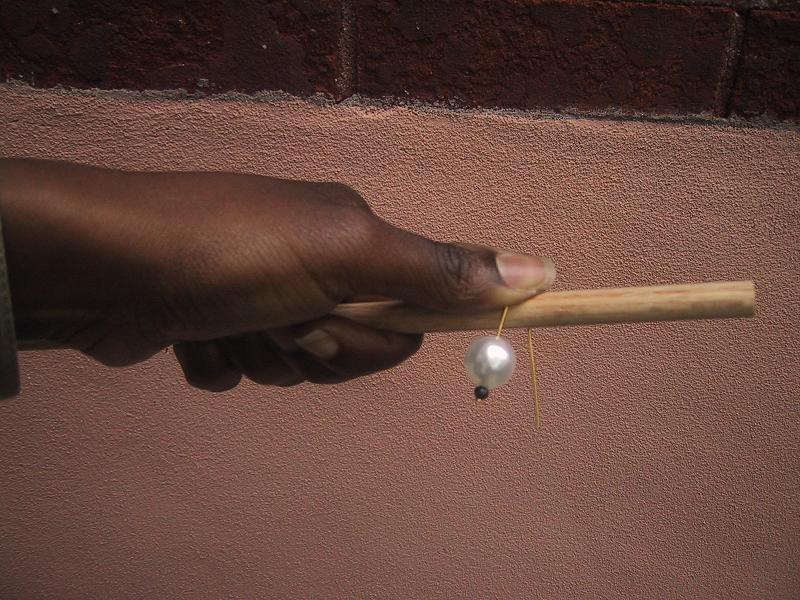 2.Bend the wire around the dowel or needle.
 3. Wrap the wire around itself on just above the top bead. I do this here with my fingers but I also use the pliers when I no longer have a good grip.
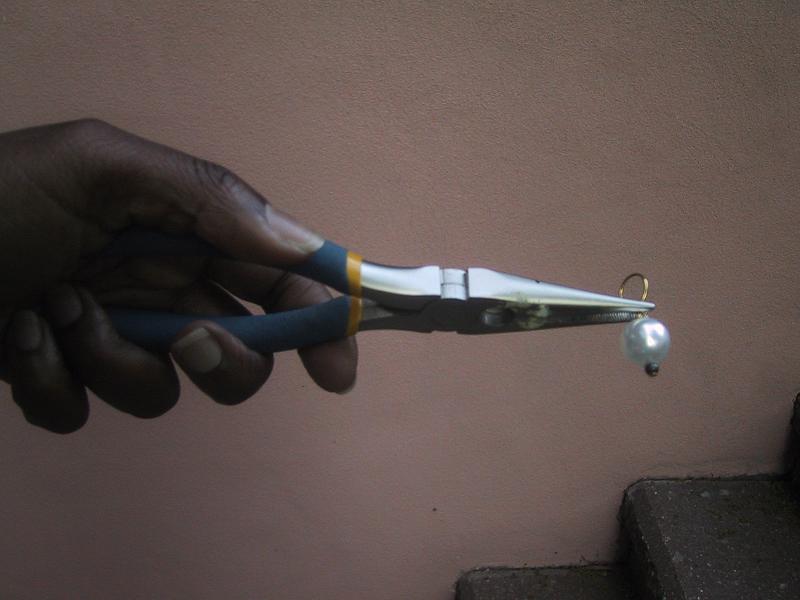 4. Pinch or cut the bit of wire left.
 5. Remove the needle or dowel and voilà! A very pretty stitch marker.
Les anneaux-maqueur qui en photos ont été faits avec les mêmes perles avec lesquelles avec j'ai fait les anneaux que je vais envoyer dans l'échange mais
Dans un de mes blogs récent j'ai eu une demande pour des explications sur la façon de faire des anneaux marqueurs. J'avais fouillé sur la Toile pour trouver des instructions et je pourrais dire que ma méthode est basée sur celle-ci quoique je puisse dire que je ne les ai pas fait en pâtes à modeler... Malheuresement je n'ai toujours pas encore reçu mon charge-batterie donc en attendant j'espère que mes intstructions sont claires...
Voici ce dont vous aurez besoin:
-Des perles. Si jamais vous utilisez cela que des stars de tennis peuvent se passer dans leurs tresses il faudrait en utiliser une autre pour empêcher la perle de tomber
-Des épingles à bijoux de 3"
-1 pince à long nez (sans dents sinon il marquera l'épingle)
-1 coupe-câble(quoique je n'en avais pas et ça ne m'a pas aucunement gêné)
-1 aiguille à tricot de 9mm ou encore un goujon de taille similaire (vous pouvez utiliser la taille que vous voulez mais j'ai décidé de les faire avec une ouverture assez grande pour qu'il fasse à plusieurs tailles d'aiguilles
J'ai acheté mes perles à rabais chez Omer Deserres. Ce magasin a une sélection assez hétéroclite et de toute façon, les prix sont comparables que partout ailleurs. J'ai acheté les épingles chez Dressmaker (2186 Ste Catherine O, QC Atwater Metro), elles y sont moins chers que chez Fabricville et c'est le seul endroit où on vend les épingles de 3".
1. Assembler les perles sur l'épingle selon l'arrangement que l'on préfère tout en laissan au moins 1" libre au dessus. 2. Plier l'épingle autour de l'aiguille ou goujon.3. Tourner l'épingle autout de lui-même au dessus des perles sous le goujon ou aiguille.4. Pincer ou couper l'excédent de l'épingle.5. Retirer l'aiguille ou goujon et voilà! un très joli bijou.
posted by Karine at 7:04 PM
![]()


0 Comments:
Post a Comment
<< Home