Yoga mat bag/Sac de tapis de yoga
 Fabric: Denim outer, kasha liner and duck interfacing
Time required: about 5-6 hours
Messing up in the previous version has actually been a blessing, it allowed to tweak the pattern for the bag, and I decided to go for duck fabric as then interfacing, it gives the bag much more body then the woven interfacing I used in bag 1.0.
Tissu: Denim pour l'extérieur, doublure en kasha et du duck pour l'entoilage
Temps requis: Environ 5-6 heures
Temps requis: Environ 5-6 heures
J'adore lorsqu'un projet qui à l'air simple exige une construction complexe et a un fini professionnel. Vraiment, ce sac me fait apprécier les trois ans que j'ai passé à l'école de mode. Mes profs de confection apprécieraient surement le travail, tout comme mes profs de patron d'ailleurs. J'ai utilisé une des premières techniques que j'ai apprises: coudre un tube sur une base circulaire en plus d'utiliser des méthodes de tailleurs pour assembler tout ça ce qui fait qu'il n'y a pas une seule couture fait à la main là-dessus.
Le fait d'avoir raté la première version m'a donné l'occasion de faire des mises au point sur le patron ainsi que la confection. Il m'a aussi permis de faire le choix d'utiliser le tissu duck comme entoilage, il donne vraiment du corp au sac.
 I'm happy I managed to make my original design. For a second there I juggled with the idea of have a bag like this, I even had the zipper for it but I was daunted by the calulations required to make the pattern, which in hindsight was ridiculous because for this bag, I simply made the tube first, measured the circumference and then drew the pattern for the base. Another change I made from the first version was giving more ease, 1" this time. Putting the mat in the first one was like trying to put a pair of wet sky gloves.
Je suis contente d'avoir réussi à faire ma première idée pour ce sac. Pendant un moment j'ai jonglé avec l'idée de faire un sac comme celui-ci, Jj'avais même une fermeture éclaire pour ce faire mais j'ai eu de la difficulté avec les calculs requis car je voulais tracer tout les patrons à l'avance. J'aurais du faire ce que j'ai fait pour celui-ci, d'abord faire le tube, en mesurer la circonférence et ensuite faire les calculs pour tracer la base. Un autre changement par rapport à la première version faite est que j'ai donné plus d'aisance, 2.5 cm cette fois. Essayer rentrer le tapis dans la première version eétait comme essayé d'enfiler une paire de gants de ski mouillé.


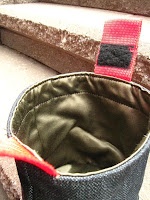
Details of the cap. My difficulty with inserting the mat in the previous attempt had me thinking that the cap would have to be wider then the bottom for ease of use so I measured the circumference of the outer shell of the bottom of the bag and added a 1/4" more for ease. I'm thinking that the velcro at the front is a bit of overengineering but I also think it will be useful in keeping the cap from slipping off. As for the strap at the back, this is my one regret: because of the way I sewed it it on the bag it makes it stand up and I hate it. I could topstitch it to stay down but in my mind the bag is done and I don't feel like starting up the maching to work on it some more. But I probably will.
Des détails du capuchon. Mes difficultés à insérer le tapis dans la version précédente m'ont fait réaliser que je devais faire en sorte que le capuchon devrait être un plus plus large que le tube et donc j'ai mesurer le tube et y rajouté un demi centimètre. Je crois que d'avoir le velcro sur le devant est peut être pas nécessaire mais il se peut qu'il empêche le capuchon de glisser. Quand à la ganse à l'arrière, mon seul regret est la façon que je l'ai cousu, ce qui le fait se tenir de façon perpendiculaire et j'haïïïs ça. Je pourrais y faire une surpiqure pour le faire se coucher mais pour moi ce projet est terminé et je ne veux pas rallumer ma machine à coudre pour ce faire. Mais je le ferai probablement.
 While testing the bag I realized the straps were too wide to be held comfortably so I folded it and stitched on about 6". ETA: ARRRRRGH! Blogger insists on rotating the darn picture.
En essayant le sac je me suis rendue compte que les poignées étaient trop larges pour être confortables dans la main donc j'y ai donc fait une surpiqure pour le refermer. Ajout: AAAAAAHHHHH! Blogger fait faire une maudite rotation à la photo.
 Details from the inside, as you can see, I topstitched the edge to sharpen it (and then ironing). I also made another topstitch about an inch from the edge to stop the liner from pulling the cap inwards while slipping it on the bottom. Actually, it's something I had to do to the bottom because the mat was pulling on the liner and it was pulling the edge inwards while I was inserting it.
Autres détails du capuchon: j'ai surpiqué le long du bord afin d'en afiner le bord. J'ai aussi surpiqué à 2.5 cm afin d'éviter que la doublure ne tire le capuchon vers l'intérieur, un problème que j'ai eu lorsque j'ai voulu rentrer le tapis dans le tube et j'y ai appliqué la même solution.
Le fait d'avoir raté la première version m'a donné l'occasion de faire des mises au point sur le patron ainsi que la confection. Il m'a aussi permis de faire le choix d'utiliser le tissu duck comme entoilage, il donne vraiment du corp au sac.
 I'm happy I managed to make my original design. For a second there I juggled with the idea of have a bag like this, I even had the zipper for it but I was daunted by the calulations required to make the pattern, which in hindsight was ridiculous because for this bag, I simply made the tube first, measured the circumference and then drew the pattern for the base. Another change I made from the first version was giving more ease, 1" this time. Putting the mat in the first one was like trying to put a pair of wet sky gloves.
Je suis contente d'avoir réussi à faire ma première idée pour ce sac. Pendant un moment j'ai jonglé avec l'idée de faire un sac comme celui-ci, Jj'avais même une fermeture éclaire pour ce faire mais j'ai eu de la difficulté avec les calculs requis car je voulais tracer tout les patrons à l'avance. J'aurais du faire ce que j'ai fait pour celui-ci, d'abord faire le tube, en mesurer la circonférence et ensuite faire les calculs pour tracer la base. Un autre changement par rapport à la première version faite est que j'ai donné plus d'aisance, 2.5 cm cette fois. Essayer rentrer le tapis dans la première version eétait comme essayé d'enfiler une paire de gants de ski mouillé.


Des détails du capuchon. Mes difficultés à insérer le tapis dans la version précédente m'ont fait réaliser que je devais faire en sorte que le capuchon devrait être un plus plus large que le tube et donc j'ai mesurer le tube et y rajouté un demi centimètre. Je crois que d'avoir le velcro sur le devant est peut être pas nécessaire mais il se peut qu'il empêche le capuchon de glisser. Quand à la ganse à l'arrière, mon seul regret est la façon que je l'ai cousu, ce qui le fait se tenir de façon perpendiculaire et j'haïïïs ça. Je pourrais y faire une surpiqure pour le faire se coucher mais pour moi ce projet est terminé et je ne veux pas rallumer ma machine à coudre pour ce faire. Mais je le ferai probablement.
 While testing the bag I realized the straps were too wide to be held comfortably so I folded it and stitched on about 6". ETA: ARRRRRGH! Blogger insists on rotating the darn picture.
En essayant le sac je me suis rendue compte que les poignées étaient trop larges pour être confortables dans la main donc j'y ai donc fait une surpiqure pour le refermer. Ajout: AAAAAAHHHHH! Blogger fait faire une maudite rotation à la photo.
 Details from the inside, as you can see, I topstitched the edge to sharpen it (and then ironing). I also made another topstitch about an inch from the edge to stop the liner from pulling the cap inwards while slipping it on the bottom. Actually, it's something I had to do to the bottom because the mat was pulling on the liner and it was pulling the edge inwards while I was inserting it.
Autres détails du capuchon: j'ai surpiqué le long du bord afin d'en afiner le bord. J'ai aussi surpiqué à 2.5 cm afin d'éviter que la doublure ne tire le capuchon vers l'intérieur, un problème que j'ai eu lorsque j'ai voulu rentrer le tapis dans le tube et j'y ai appliqué la même solution.
Labels: FO, Objet terminé, sac de tapis de yoga, yoga mat bag
posted by Karine at 6:17 PM
![]()


2 Comments:
Awesome. Your sister will be very stylish with her bag to Yoga.
It looks so well done. Your sister will love it, I'm sure. You're so skilled! Impressive. :)
Post a Comment
<< Home